Photography Workshop in Worthing, Sussex. Landscape Photography by Slawek Staszczuk.

How to achieve depth in landscape photography

Why do my landscape photos look flat?...

Obviously, photographs are usually flat (unless they’re wrapped around or projected on some curved or uneven surfaces). So, that explains everything… And still, compelling landscape images often exhibit a certain three-dimensional quality. Since the actual scene is represented on a flat surface, the effect must be an illusion of sorts. And it certainly is, but it’s not something that happens completely at random, beyond our control. You can take specific steps to achieve depth in your landscape photography on a consistent basis.

Humans have many advantages over cameras in the way we perceive the outside world. Binocular vision, which instantly gives us some depth perception; it’s even more powerful coupled with our restlessness – the slightest movement of our heads translates to an apparent shift between objects at different distances from us, which further informs us that we’re looking at forms in three-dimensional space. The camera takes stills, while we enjoy a constant “video stream”. Our dynamic range is much wider than the camera’s. Plus, when we take in a view, other senses are typically involved: we hear the sounds of the surroundings, smell the scents, feel the breeze or the sunlight on our skin. And all of this creates an emotional response.

Autumn in the West Sussex countryside. Depth in landscape photographs.

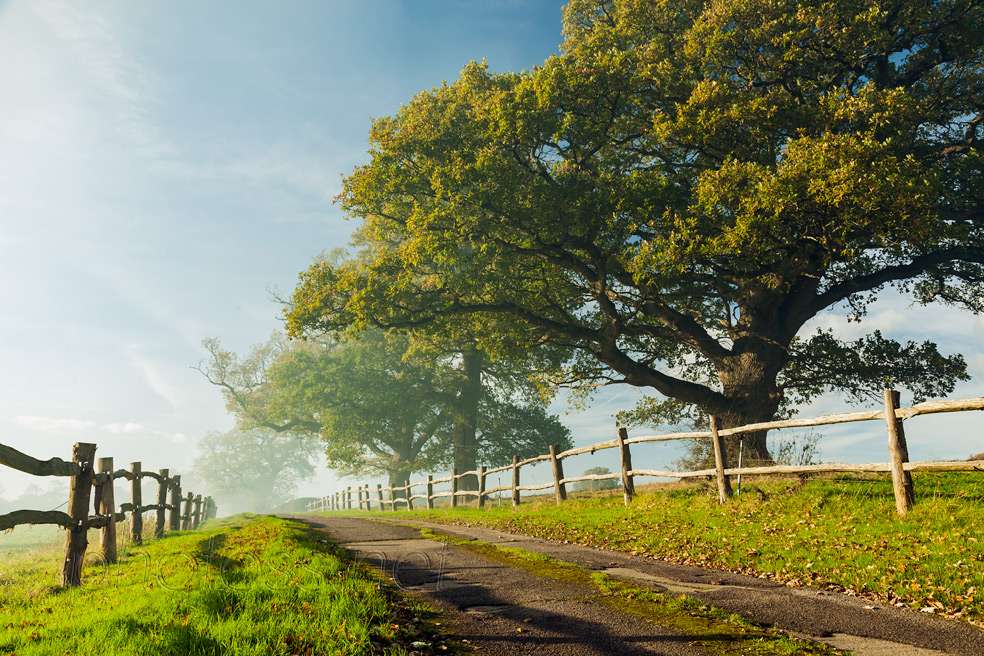
Autumn afternoon in the West Sussex countryside.

To do justice to this rich multi-sensory experience in a single still shot is a tall order. The results usually pale in comparison to “the real thing”. But photographers have at their disposal certain tools that can help to recreate at least some of the visual impact of the scenes they witness.

There are probably countless devices and “tricks” that can help you build this illusion. But here I’d like to share just a handful that I consider most useful and effective. They are in no particular order (apart from lighting perhaps, as there’s nothing more important in photography). They’re also not completely separate from each other. There’s a lot of overlap between them, and they usually work best in concert.

  1. Lighting
  2. Linear perspective
  3. Atmospheric & colour perspective
  4. Compositional devices

Lighting

WHAT IS LIGHTING

When photographers talk about lighting, they mean so much more than just the position of the sun in the sky, or the placement of another light source, and the intensity of light. It’s also about your position relative to the light source. And about how the light operates on different areas in the scene, how it bounces between different elements, and how well those elements work together visually as a result. And about how it brings out the colours and textures.

St Botolph's church near Steyning

The Saxon church of St Botolph’s near Steyning, West Sussex.

As you can see, the sunlight was coming from the left, slightly from behind the camera at a low angle (evening). This brought out a lot of texture on the grass. The church facade and its side are visible at the same time, both receiving different amounts of light. (The front bathed in sunlight, the side only indirectly illuminated by reflected light, mostly coming from the sky.) Cast shadows provide some grounding for tombstones.

Very often the same object, say a rural church, will have poor lighting when seen from one particular angle. At the very same instant it may have good lighting when viewed from a different perspective.

HOW LIGHTING CAN CREATE DEPTH IN LANDSCAPE

What creates the impression of depth is mostly the interplay of lit and shaded surfaces. If your main light source is directly behind the camera, typically you won’t see a lot of shadows in the scene. That’s because the objects or features casting those shadows will be blocking them from your view.

Cast shadows also serve to ground objects, like trees, rocks or buildings, placing them at a specific position in the scene; without the shadows those objects can appear to be floating in mid air, which doesn’t help to sell the illusion. To see the shadows and shaded parts of objects and features in your scene, you typically need the primary light to come somewhere from the side, at a range of possible angles.

St Botolph's church near Steyning

The same church just minutes later (sadly, I couldn’t be in both places at the exact same time).

Apart from the rainbow “bonus”, the image overall is much flatter. With the sun exactly behind my back, even though you can see two sides of the church, they were both getting similar light treatment and there is little tonal difference between those surfaces.

There is a lot less nuance in the textures; the shadows visible in the frame were cast by objects behind the camera, they don’t ground anything. The sky backdrop behind the church is less interesting, less dramatic, and the church less defined – all part of “lighting”.

Linear perspective

WHAT IS (LINEAR) PERSPECTIVE

As the distance between us, the observers, and the objects we’re looking at increases, those objects seemingly shrink in size. This is called “foreshortening” (in itself a kind of illusion, as it’s not a physical property of any objects, but part of our perception of them).

We’re used to a certain speed or rate of foreshortening, which is most closely matched by standard lenses. (Around 50mm focal length on a full-frame camera, or equivalent on differently sized sensors.) When you look at the scene through a wide angle lens, the foreshortening dramatically accelerates and the perspective is exaggerated. If you’re using a telephoto lens, the opposite happens – the foreshortening is less obvious and the perspective is consequently flattened.

Misty woodland in West Sussex. How to achieve depth in landscape photography

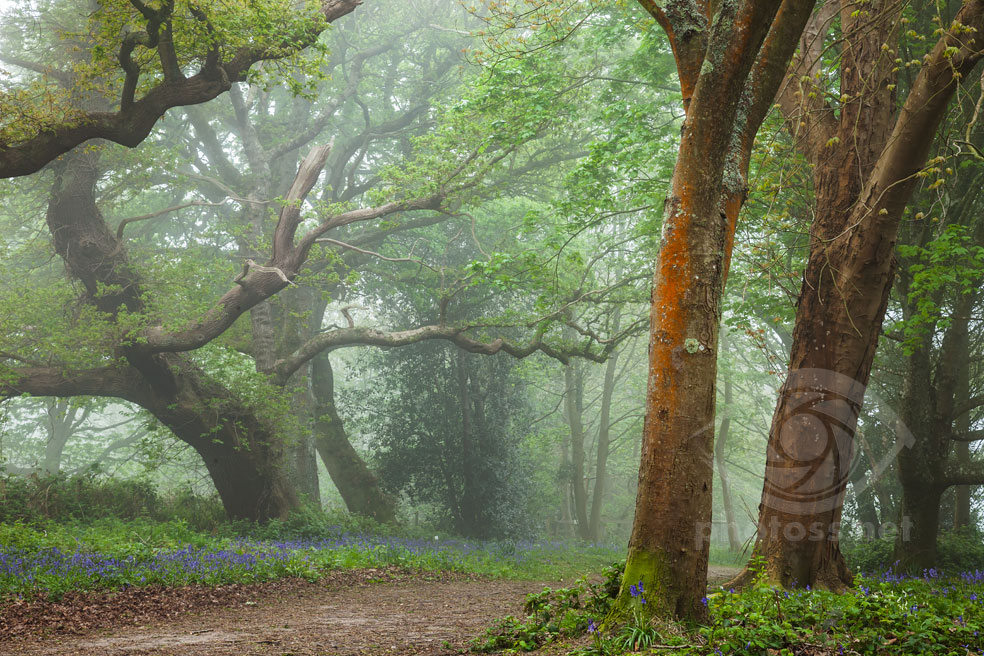
Spring morning in a West Sussex woodland.

Taken with a longer lens (75mm). The foreshortening resulting from this focal length was “slower” than what we can see with our naked eye. Consequently, it flattened the perspective by making the apparent distance between trees appear closer than it was.

This may not be very helpful when we want to create the illusion of depth and distance, but in this instance the atmospheric content was so abundant that it more than made up for that deficiency. I was able to achieve all the separation and definition I needed, thus creating the illusion of depth, thanks to atmospheric and colour perspective.

To learn why I often favour the use of longer focal lengths when shooting woodland scenes, even though they inevitably flatten the perspective, check out this article.

If you arrange the elements in your frame in a thoughtful manner, you can make linear perspective play a major part in the overall illusion. At least when using wide to mid range angles of view. For example, any array of similar objects, like telephone posts, houses, trees, receding away from the viewer towards the vanishing point will strongly suggest space, distance and depth.

Darmoor. How to achieve depth in landscape photos.

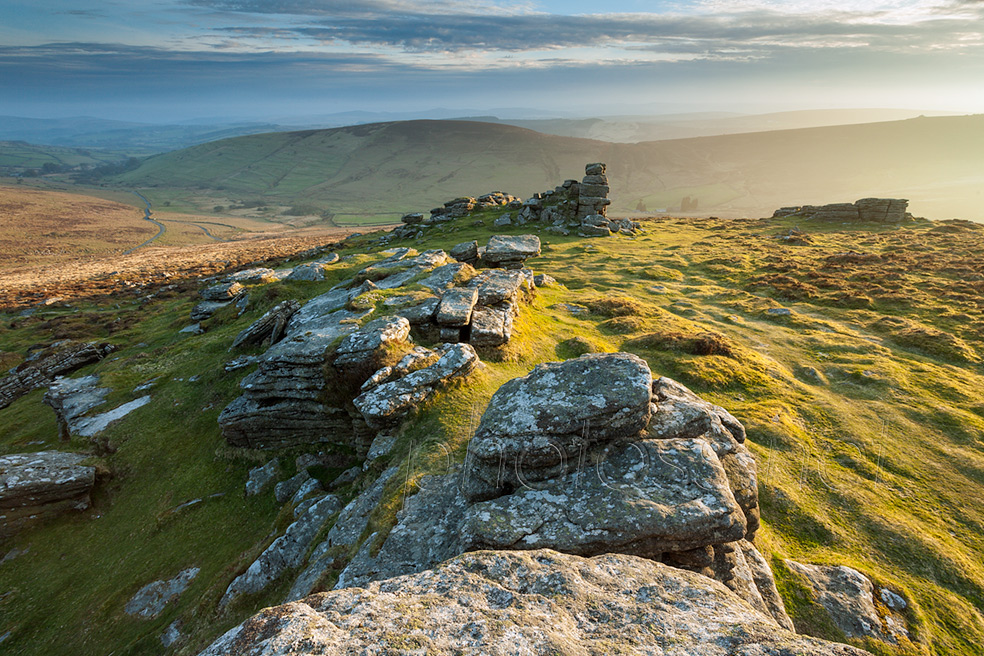
Spring evening on Hookney Tor in Dartmoor.

Taken with a super-wide lens (17mm). The perspective is exaggerated, making the foreground slabs appear much larger than the rest of the rocks. Or, to put it differently, the lens visually pushed the mid ground and background further away from the viewer, creating an impression of more distance.

The effect is strengthened by favourable lighting and atmosphere (atmospheric perspective).

As for long lenses, since they flatten the perspective, they usually tend to do the opposite of what we want when trying to impart depth to our images. I find in telephoto landscapes it’s mostly the lighting, often coupled with atmospheric perspective, that serves to build the impression. Plus, naturally, compositional choices.

Atmospheric & colour perspective

All kinds of particles (moisture, smoke, pollution etc.) floating in the air create a filter of sorts, which affects our perception. The longer the distance between us and the features we’re looking at, the more of a build-up of this particulate matter and the stronger the filtration effect. It lowers the saturation and contrast with distance. At the same time, it makes the surfaces appear increasingly cooler. 

How to achieve depth in landscape photography. Autumn sunrise on the South Downs.

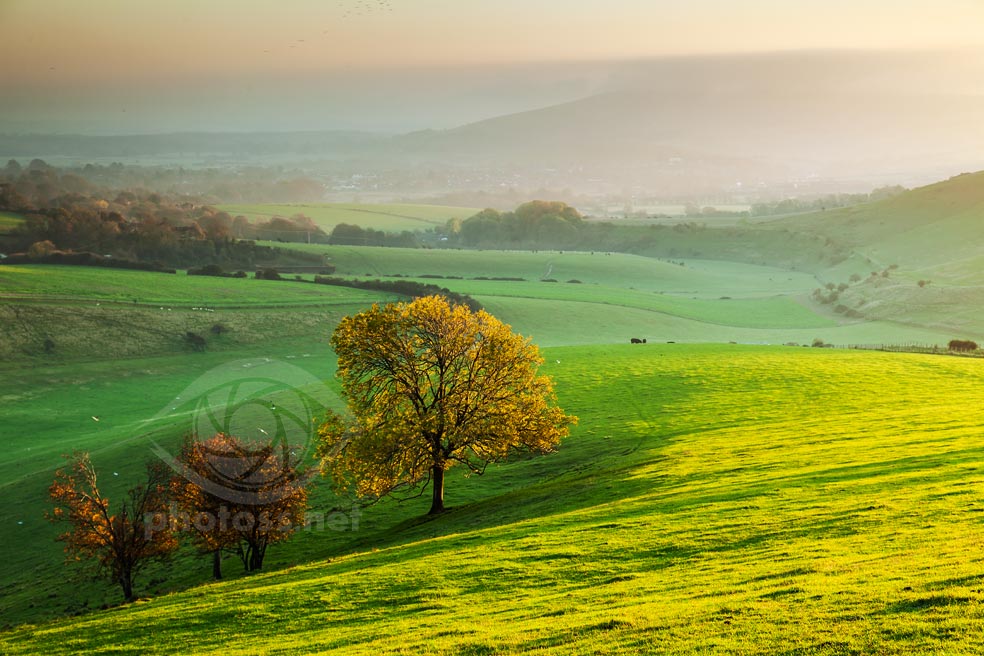
Autumn sunrise at Steyning Bowl in West Sussex.

You should be able to clearly see how level of contrast gradually decreases the deeper you go into the image. The same is happening with saturation – the buildup of atmosphere slowly dims everything down with distance. And with the colour temperature – everything becomes cooler the farther away you look.

As is to be expected, atmospheric and colour perspective will serve better in the creation of depth in your images when used in a thoughtful composition.

Conversely, objects close to us appear to have much warmer and more vivid colours, and to have a lot more detail, definition and “snappiness” (which is obviously also due to the closer distance – our eyes have limited “resolution”).

Have you noticed that on exceptionally clear days distant objects appear to be much closer than usual? I live on the coast near Brighton and can see an offshore wind farm on the sea during my daily walk. It looms a few miles away from the land. Normally it’s somewhat dim due to the moisture and pollution in the air. But on occasion, when the air is unusually clear, the turbines seem to be much closer to the shore…

We all know it from experience without ever having to think about it. Atmospheric perspective helps us decode reality, judge distances. It helps us figure out what’s closer to us, what’s farther away, what’s in front, what’s behind. Sometimes we can harness these principles to build or reinforce the illusion of depth in our photos.

Swiss Jura mountains.

Dawn in the Jura Mountains, Switzerland.

Again, as the landscape features recede into space away from us, the level of contrast drops, everything becomes bluer and less saturated.

Composition

Great lighting, linear and atmospheric perspective won’t be much help when you try to create the impression of depth, unless they’re skillfully used in a thoughtful composition. I would also put the choice of vantage point and focal length under this banner. Although they’re not strictly speaking part of composition, they will determine your options to an important degree.

How to achieve depth in landscape photographs

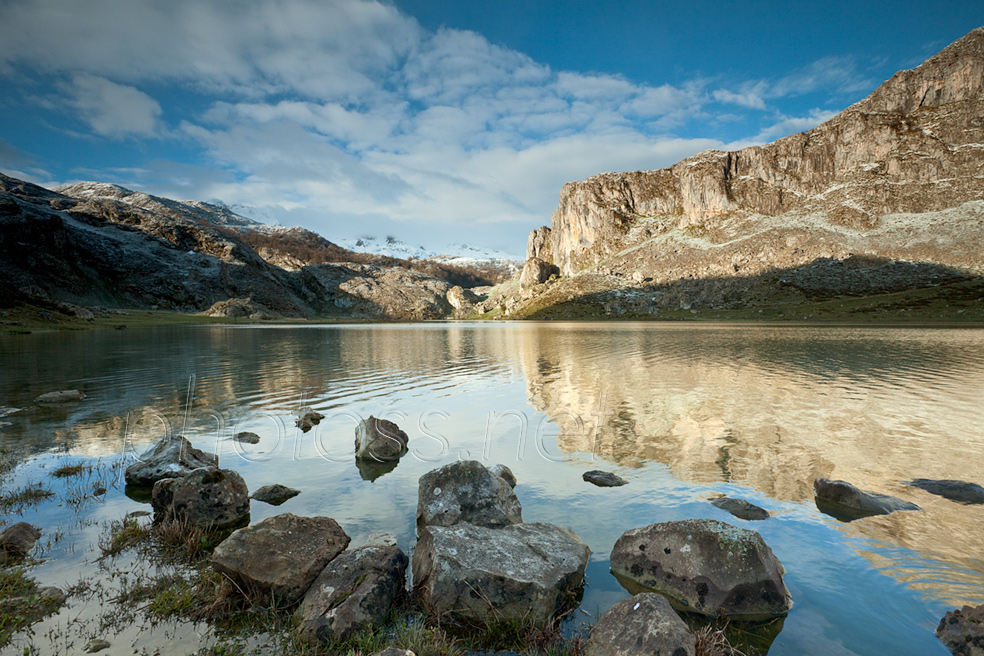
Morning Lake Ercina in Picos de Europa, Spain.

Sharply defined, rough contours of the foreground boulders play against the softness of the rippled water surface. At the same time the tonal contrast between those two elements creates further separation.

JUXTAPOSITION, SEPARATION, DEFINITION...

Arranging the objects and features in your frame in a way that creates separation between them, especially those at different distances from the camera, can greatly help the illusion along. Otherwise, if separate elements of the composition blend into each other, it’s be very difficult to capture any impression of depth.

How to achieve depth in landscape photography

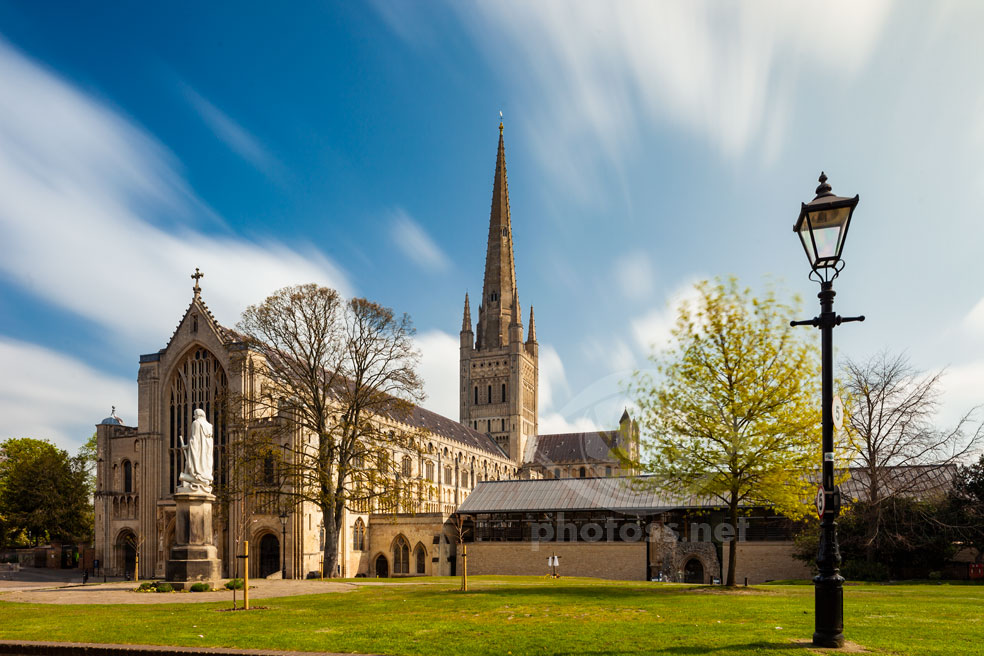
Norwich Cathedral at midday.

Angular man-made structures and objects set against the softness of sky on long exposure (15 seconds – the clouds were moving fast). The colours of the walls are warm, the sky provides a cool background.

On a micro level – I was careful to place the white white statue on the left against the shaded faced of the church for better definition. (It would be much weaker with the clouds or even the sunlit side of the church as background.)

Juxtaposition of different qualities is one way we can achieve this separation. The most obvious example is tonal contrast: placing dark objects against bright surfaces and vice versa. But it’s only one of many possibilities. Others include: contrasting cool colours against warm, setting organic flowing curves against angular man-made structures. Juxtaposing strong vertical shapes against the backdrop of horizontal lines; hard edgy contours against softness etc. Placing an immovable object against a moving background can be very effective too. Particularly if you experiment with shutter speeds, or simply go for a “proper” long exposure.

How to achieve depth in landscape photography. Autumn in Brighton.

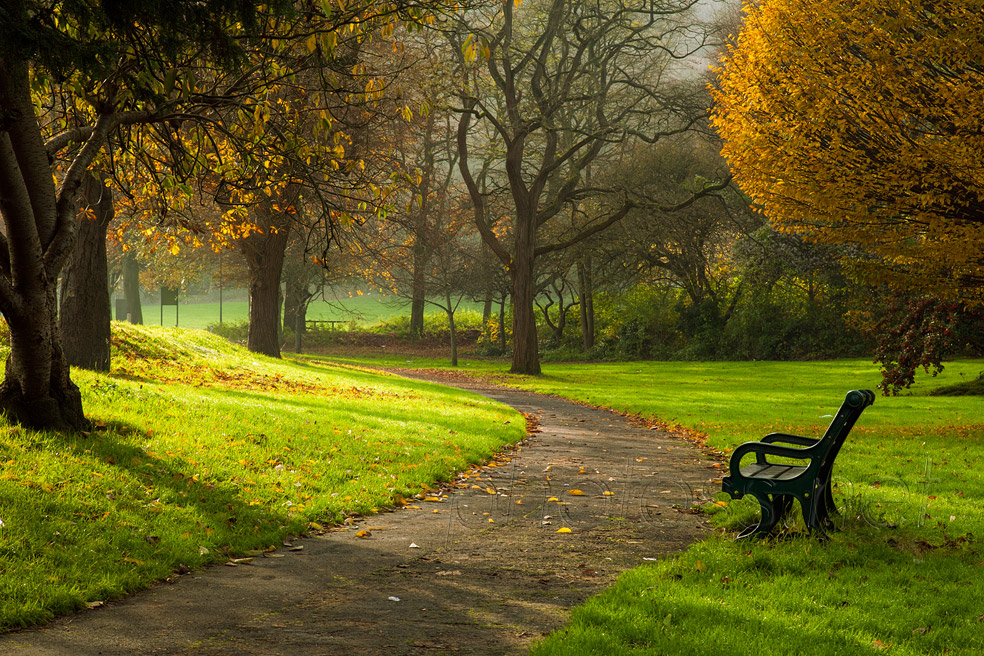
Autumn afternoon on the outskirts of Brighton.

The footpath provides “leading lines”, leading towards the centre of the image. I was also careful to place the dark silhouette of the bench, which I felt was an important part of the frame. against the softness of green behind.

To achieve depth in landscape using those tools, we typically need to be willing to move around. Often taking a few steps to the side or squatting will make a huge difference in how individual areas of the scene interact visually. Of course, sometimes there is only one available vantage point to take a particular scene, like a viewing platform in the mountains. Then we have to make do with it.

But if you have any room for manoeuvre, there are no excuses to not explore different options. Once you’ve figured out the “big picture”, you can switch your attention to local or micro compositions and tweak them by adjusting your position, height, angle of view. Pay close attention to how seemingly tiny differences translate to important changes in the composition.

How you can achieve depth in landscape photos. Swiss countryside.

Rural church in the Jura Mountains, Switzerland.

The snaking footpath leads into the centre of the image. Since it has a substantial width, linear perspective further helps it to play its role in the building of depth impression.

"LEADING LINES"

This term brings a wry smile to many faces. And rightly so, it’s threadbare at this point. And it’s certainly not the only compositional device, nor is it the most important one. (There is no such thing, the best tool is always what works best for the scene.)

But it can be helpful in the context of building the depth illusion. Those lines can sometimes lead into the picture, along the Z axis. This way they can add to the overall impression, usually when combined with other tools. Leading lines can come from kinds of sources. A winding road or footpath, kerbs, fence beams, shoreline, a river, the trunk of a fallen tree. I’m sure you can think of many more examples.

Again, nothing works in a vacuum, so the effectiveness of “the leading lines” will depend on your vantage point, the lighting, how you arrange the composition otherwise.

The role of editing and final thoughts

I didn’t list editing, or processing, as one of the tools we can use to achieve depth, because I don’t think that’s where depth is “created”. Skillful editing can certainly enhance or bring out the sense of dimension that has been captured in the image. But it can’t conjure it up out of whole cloth. (For examples of my approach to and modest extent of processing, see these case studies: seascape, telephoto landscape)

You can, of course, relight and even totally repaint your entire scene using software tools, like brushes and multi-layer setups. And you may even be able to create something spectacular in the process. But is that still photography?

There is no one-size-fits-all solution or a magic switch that can make your pictures appear three-dimensional. The effect is usually a combination of many small things. But you can achieve it and you’re not entirely at the mercy of some unseen forces. This short article is only a very brief overview of a really deep subject; probably a whole book could be written about it. Still, I hope that it is has at least helped you see your landscape photography in a different light and encouraged you to experiment next time you’re out and about (all puns intended).

Thank you for reading. Check out other similar articles in my Landscape Photography is Simple “blog”. Or click on a random post below.

Leave a Comment

Your email address will not be published. Required fields are marked *